
Among the many plans that got scuppered during the long Covid lockdows were a succession of 50th birthday celebrations, for both us and some of our pals from college. We steadily ticked them off with inadequate Zoom replacements, debating which one of us would be first to be allowed to celebrate theirs with a proper gathering of people. By the time lockdown lifted, all bar one of us – a September born youngster – had all said goodbye to our 40s.
Larry, the first to reach 50, was also the first to throw open his doors to a post-restriction-lifting party. And while the rest of us had been muddling through lockdown, trying to work out how to fill our fridges and cupboards without leaving the house, Larry actually used the time wisely: by building a bar.
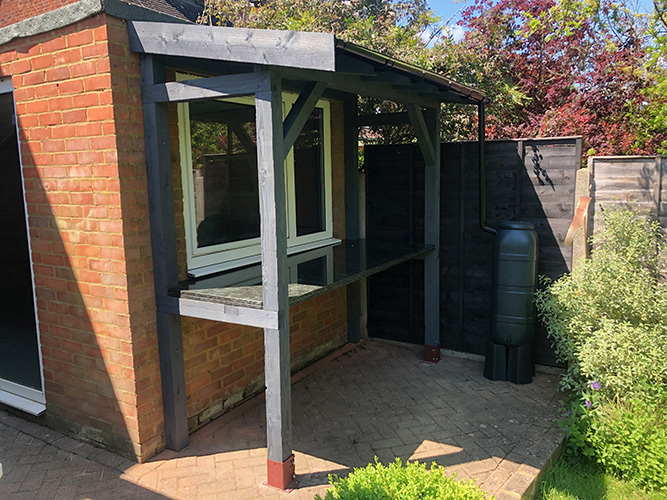
It’s a magnificent piece of work too. A small, covered bar fixed to the outer wall of an outbuilding he recently converted into an indoor bar (another lockdown achievement) that helped the party go with a swing. So impressed were we by his construction that we struck up a deal with him – send us some tips on how to build it and we’ll supply the beer (which, in turn, we secured from a deal with our good pals from Krombacher).
Each of us new fifty-year-olds is now eager to follow Larry’s lead and build our own bars, and if another lockdown strikes then this time it’ll give us a proper project to help while away the days.
How to build an outdoor bar like Larry’s…
Larry’s own brief was to create a bar that “looked chunky and aesthetically matched a wood store I’d previously built” (crikey, he really was busy during lockdown). “I had a lovely piece of granite worktop left over from a kitchen remodelling we did a couple of years ago and that dictated the size.”
To hold a hefty piece of granite, the supporting timber needs to be strong, sturdy and suitable for outdoor use. The frame was made mostly from standard fence posts (so already treated for exterior use) with a thickness of 100mm (4inch) square, supplied in 2.4m lengths (although Larry suggests a thickness of 75mm (3in) would suffice). Some 75mm thick wood “left over from the wood store” was used for the diagonal bracing at the front, and the roof rafters were made from 100mm x 50mm pieces.
Larry adds one important note to those looking to purchase wood for DIY projects: “There is shortage of wood at the moment and prices have gone up by 10 – 50% in some places so it’s best to shop around. You can often get better deals at independent builders suppliers rather than the big DIY stores.”
Construction
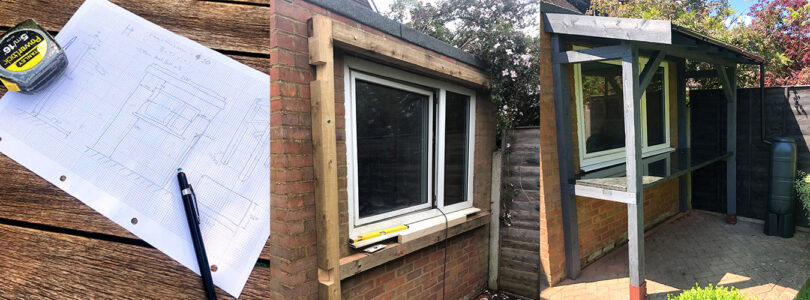
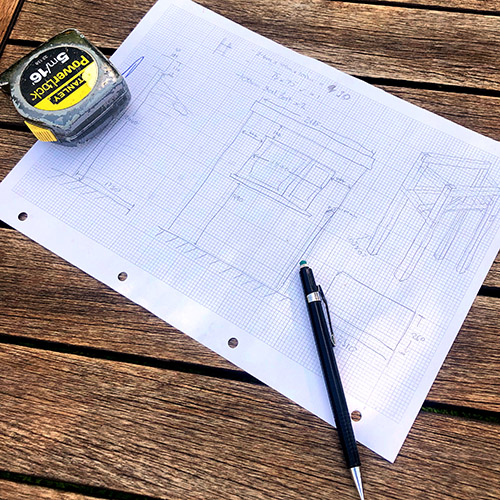
The first job for any build is to draw up plans. Measure everything thoroughly, work out angles, write them down, and then do it all again to make sure you got it right the first time. For increased precision, you should consider using a green laser level, which will also help to align any materials that are on different levels. When you’re confident you know what you’re building, cut the wood to length and get everything ready to assemble, then start with the frame.
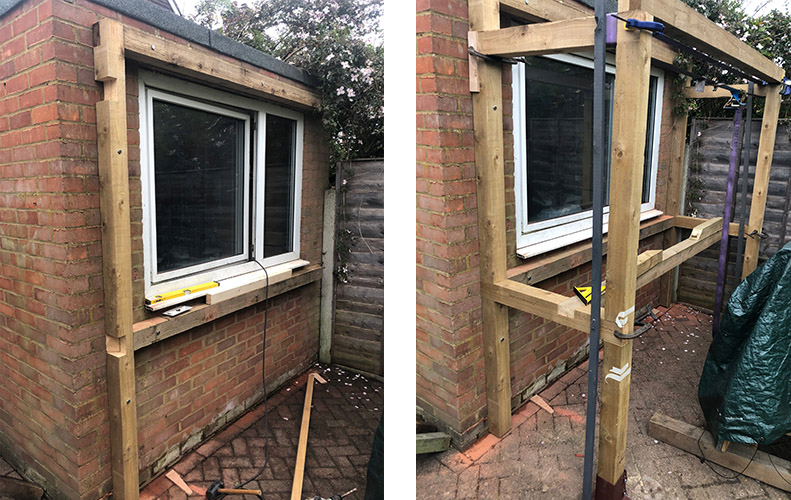
Here’s how Larry made his frame as strong and secure as possible: “To fix the frame to the outside brick wall I used 3 ‘M10′ (10mm diameter) 150mm long bolts in each of the two vertical and two horizontals. I pre-drilled 12mm diameter holes in the brick (not in the mortar) and screwed in appropriate sized rawl plugs. For the verticals fixed to the wall, make sure you lift the base of the post a little off the ground to prevent rot. To fix the posts together I used half lap joints, drilled holes through both pieces and glued in 10mm hardwood dowels to secure them.”
With the frame in place, and before that slab of granite was lifted into position (“get a friend to help”), the next job was the rafters. “For the roof rafters I cut the angle top and bottom and cut a birdsmouth joint to fix them to the main frame. To secure them I used 100 mm wood screws but made sure to pre-drill a hole first to prevent the wood splitting. On top of this I put a sheet of plywood which I first treated with a wood preservative, paying particular attention to the edges as that’s where they get the most weathering. On top of that I put a layer of shingles (a thin roof covering) and sealed it with mastic – make sure you buy plenty of mastic and be quite generous with it).” Let the mastic dry and you’re ready for the booze.
Larry’s top tool tips
Ever the pro, Larry has a well stocked shed of tools. Here are the ones that helped him the most…
A hand held circular saw by Makita which was “a massive time saver for all the half lap joint cuts.” (Don’t fret on this – it could all be done with a hand saw if that’s all you have).
A sharp chisel to clean up the joints after sawing.
A decent drill with a hammer action setting for the brick drilling (use the normal setting for pre-drilling the wood for dowels and screws).
“My lovely new Makita impact driver for screws (yes, I treated myself to a couple of Makita cordless tools and I am very happy)”. Show off.
Various hammers for ‘persuading’ things to get into place.
Clamps and a ratchet strap to hold everything together whilst the glue dries.
Bar stocking
Here are the top boozes from Larry’s party bar…

Krombacher Pils kegs
Our top level business negotiations secured a few mini kegs of Krombacher Pils, which went down very well with the guests. Mini kegs are the way to go for a big party: a constant supply of beer and you can fill your glass with as much or as little as you wish. The packaging also gives the beer an extra bar freshness that elevates it from bottles and cans. German Pilsners are great crowd-pleasers – suitable for not only those that like their lagers, but of a pure quality that fans of English beers can also enjoy. Krombacher Pils has an extra touch of sweetness that really helps it go down well with food – a very Germanic hog roast in this instance.
Four Pillars Gin
Larry and his wife are big gin fans, so most of the bar space was taken up with a large selection of juniper based spirits (the beer kegs were a feature of the indoor bar). We donated the excellent The Outdoor Guide Gin to the collection and our pick of the rest on offer was from Aussie distillery Four Pillars. This gin isn’t overburdened with curious botanicals, instead it has a lovely zesty freshness (oranges) to accompany a backbone of juniper and spice.
This is a collaborative post